How to Configure Our Apple Pay Integration
We all use Apple Pay, Apple's tap-to-pay, to make purchases. This article explains how you can configure your device so that those transactions are entered automatically.
If you would like to configure your device so that when you make a purchase via Apple Pay, a transaction is automatically created in MyFinancials, then you've come to the right place! In addition, because we use Apple Shortcuts, the same type of automation can grab text messages and create transactions from them. And there are a myriad of other automation options as well.
Video Available
You can watch this video that takes you step by step through the process. The following text explains what you see in that video.
Apple Shortcuts
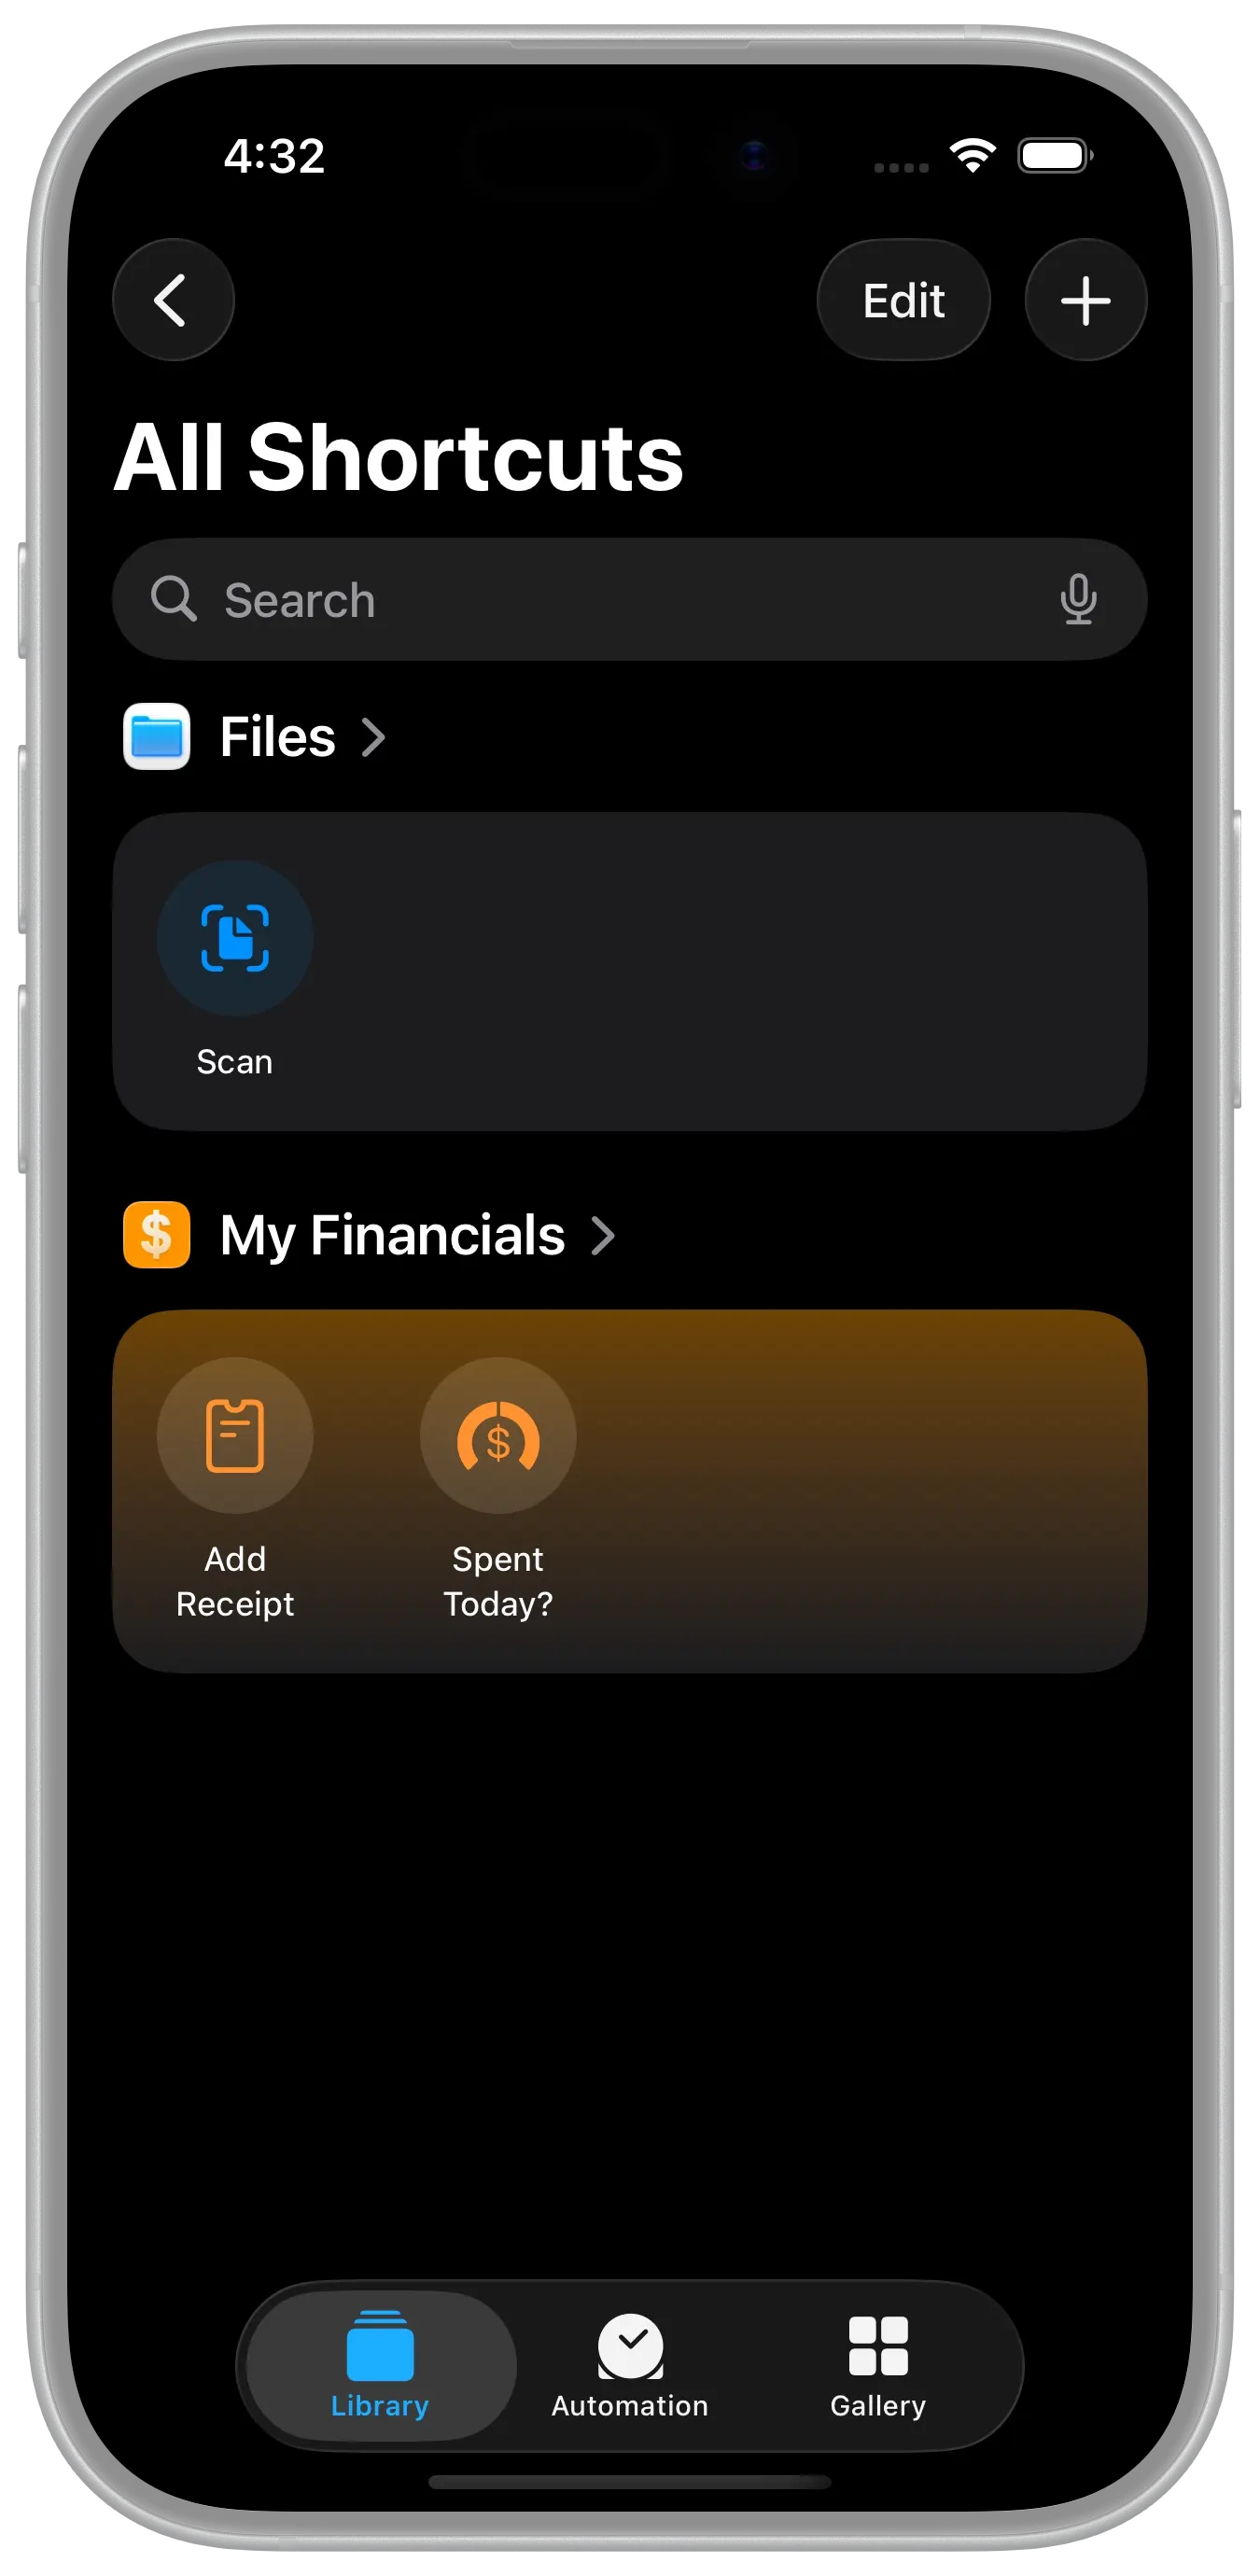
Understanding Apple Shortcuts is beyond this article, however they can be used to interact with MyFinancials. There are a few Shortcuts are installed with MyFinancials. The one we want to invoke in our Automation is "Add receipt." You can try that out by opening "Apple Shortcuts" and tapping it. It should prompt you for the details behind the receipt you want to enter. After entering those details you can launch MyFinancials, navigate to the Receipts area, and view the details of that receipt. From there you can tap to enter the receipt as a transaction in an account.
Configuring Shortcuts
But of course you don't want to enter the details every time manually, instead you can create an Automation (or you can use Siri which is discussed in this article). When Apple Pay is used on that device to make a payment, those transaction details are captured and sent via the Transaction Trigger to the Shortcuts app.
Configuring this feature involves a few steps, but it's relatively straightforward.
Here's How to Set It Up

Step 1: Create a Personal Automation
First, create a personal automation by opening the Shortcuts app and going to the "Automation" tab. Tap the "+" button to add a new automation and select "Transaction" in iOS 18 or "Wallet" in iOS 26.
Step 2: Configure the Transaction Trigger
Next you configure the transaction trigger by selecting the cards, categories, and merchants that this automation will apply to. You can leave all options selected. However, at the bottom of the screen, select "Run Immediately" to avoid having to manually confirm it. Tap "Next" to continue.
Step 3: Select "New Blank Automation"
Now select "New Blank Automation" to create a new one.
Step 4: Select the Actions Needed
Inside this new automation search for and add the following actions: (1) Match Text, (2) Number, and (3) select the "MyFinancials" app, and choosing the "Create Receipt Transaction" shortcut for your final action.
Step 4: Learn How to Connect Actions
The objective is to connect the actions together so that as the data flows from top to bottom you achieve the task of taking the transaction parameters (amount, merchant name, card name, etc.) and pass them to the My Financials shortcut action which uses them to add a receipt.
The Apple Pay transaction is passed into the automation at the very top (see "Receive transaction as input"). And the "Add Receipt" shortcut is at the bottom. Please know that connecting the actions together properly is where most issues occur due to the complexity of Apple's Shortcut configuration interface.
A quick primer to help you understand how to connect actions is in order, as it sometimes boggles the mind, how Apple's connection interface works. That said, it is simple. Apple would say, "it's magic." You see, each action provides "magic variables" that you can connect to pass that value into another action. Thus, you will be filling out each of the blue fields. You do that by tapping a text field or parameter to bring up the keyboard/variable bar, then you select the output from a previous action (a blue token) or a special variable like "Current Date" to insert it, allowing you to use data from one action (like "Shortcut Input" aka "transaction" in this case) as input for another (like "add receipt"). You can then tap the inserted variable to customize its format (e.g., showing only the date, not time) or select specific details from it.
Step 5: Make the Connections!
Here's what it should look like when you're done. So there's one thing that you may have noticed below that you should understand. The "shortcut input" is a "transaction" which has an "amount" field that is a textual based field that contains a string representing the amount (e.g. "$4.58"). My Financials requires a specific numeric amount. So the "Match" action accepts the transaction amount property, strips it down to just the numeric part as text. The "Number" action takes that text and converts it into an actual number. That number is then passed into the "add receipt" action.
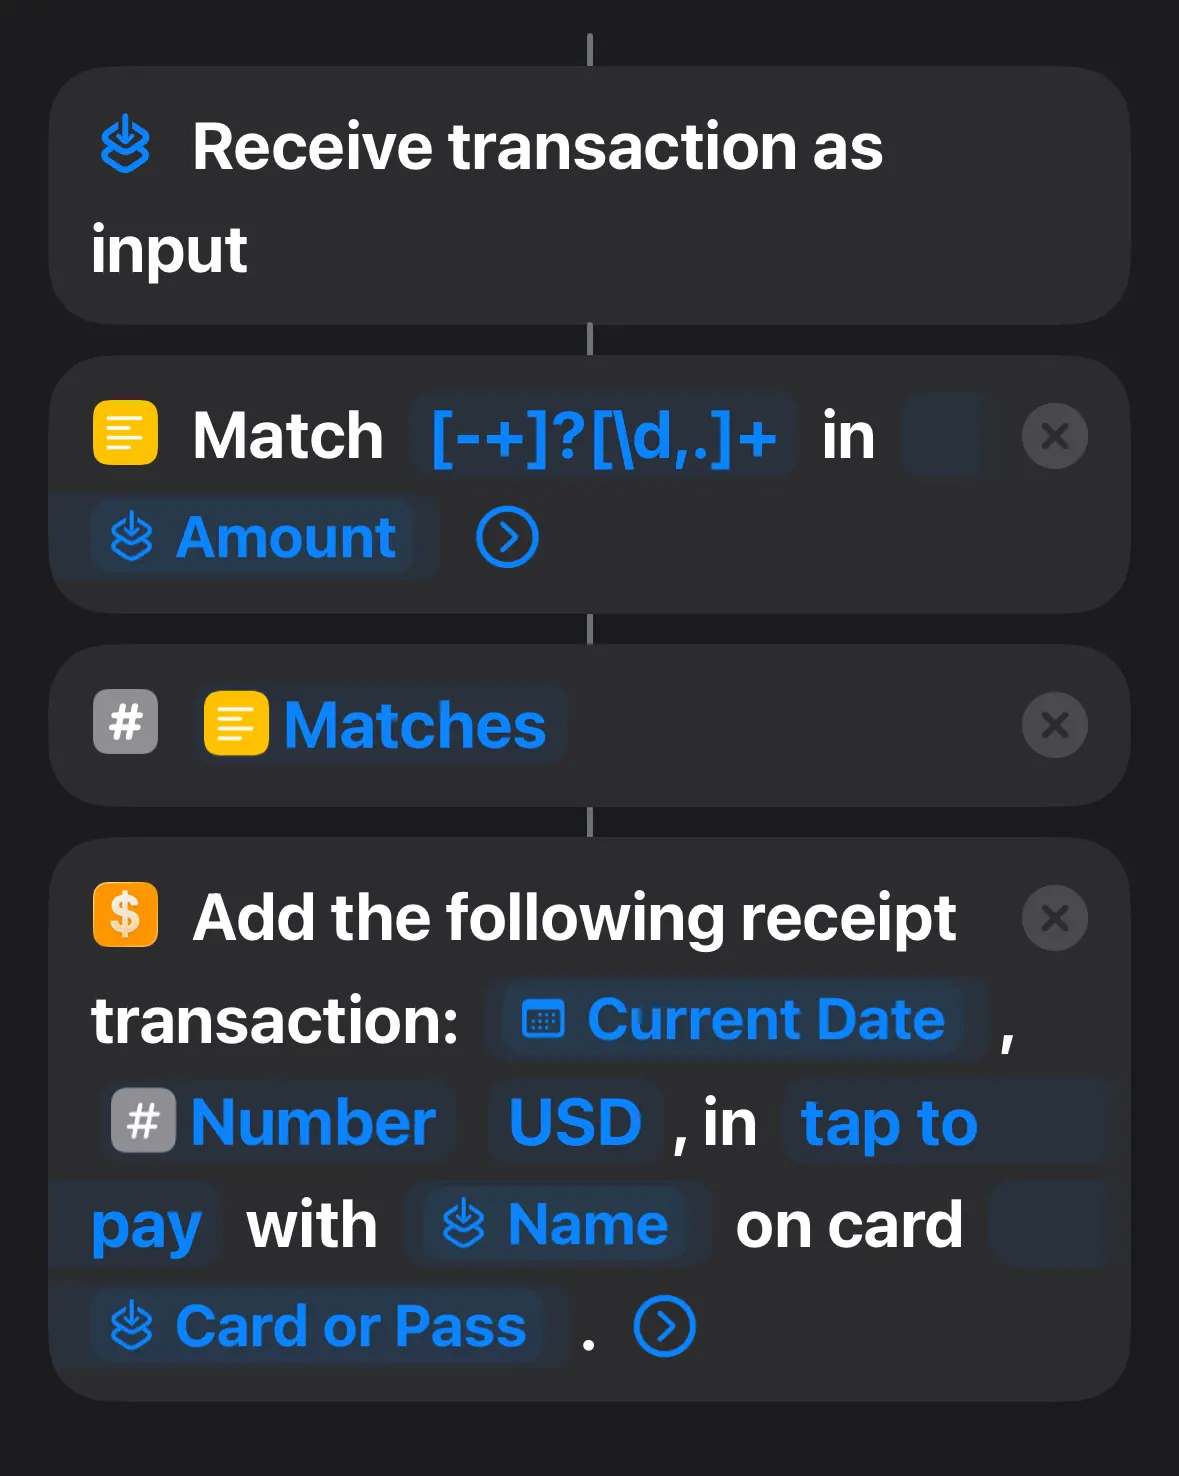
So, to configure things properly, you need to configure the Match action as shown above. The text in the match is a regular expression that strips the Shortcut Input -> amount to a string that includes only the characters that can be converted to a number. The Number action should be configured to take the "Matches" output from the Match action. It produces a "Number". Finally, tap each field in the "Add the following receipt transaction: Date, 0 USD, in Category with Merchant Name on card Card." Fill in each field, one-by-one, by first tapping the field itself (e.g. Date), and then tap "Select Variable", and then choose "Shortcut Input" (above on the line). The field name should now be replaced with "Shortcut Input". Now tap that new "Shortcut Input" which replaced the field name itself and configure the field as follows:
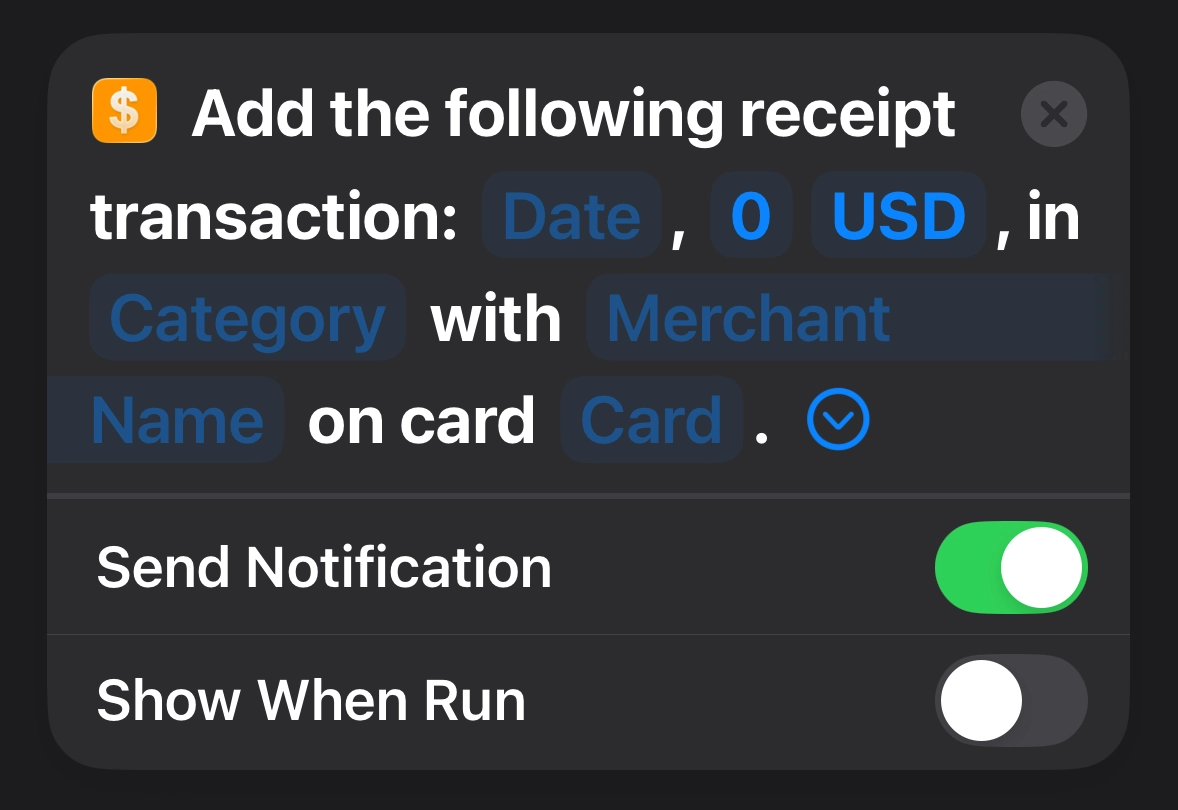
| Field | Configuration |
|---|---|
| Date | Change "Type" to Date, select "Date", select ISO 8601 as the Date format, turn off the ISO 8601 time. The example should look like: "2026-09-09" |
| "0 USD" | There are actually two fields here the amount field defaults to "0" and the currency (ISO 4217 currencyCode) field defaults to the currency code of your device's locale. Change the "0" field as described above to Type: Transaction, Amount. You can typically leave the currency field at it's default. |
| Category | Uncategorized (just type it in) |
| Merchant Name | Type: Transaction, Name |
| Card | Type: Transaction, Card or Pass |
OPTIONS: If you drop down the chevron for the action, you can set additional options. One that you might want to set from an automation is the "Send Notification" option. This will send a notification to your phone instead of showing a result for Siri.
Note: Once you have all of the fields above configured you are done and your automation should work.
Download Today!
Watch the Video
Step-by-Step Video Instructions
Here's a video that takes you step-by-step through the process described in this article. Sometimes visual learning is better!
Video